How to clean your dollhouse and miniatures sounds simple, but when your set is old, dusty, or delicate, it can feel scary to even touch. You don’t want to break tiny furniture or ruin faded paint. Maybe your plastic has turned yellow. Maybe dust has settled into every little crack.
Don’t worry. You can clean it safely at home using tools like a soft brush, a microfiber cloth, and even hydrogen peroxide for yellow parts. This easy guide shows you step by step how to bring your vintage dollhouse back to life, without damage, mess, or stress.
What You Need Before You Start
You don’t need fancy stuff to clean your vintage dollhouse. Just a few soft tools and some safe liquids will do the trick. Start with a soft brush to dust off tiny parts. Use a microfiber cloth to wipe flat spots. For tight corners, cotton swabs work best. Got tiny bits stuck in hard places? Use tweezers or canned air to lift them out.
It’s also smart to wear cotton gloves. They keep your fingers from leaving marks. And if you plan to clean plastic that’s yellowed, set aside a little hydrogen peroxide and make sure you have a sunny spot nearby. That will come in handy later.
Quick tip: Keep all tools in one tray so you don’t lose small pieces while cleaning.

Tools You Need to Clean a Vintage Dollhouse Safely
Before you begin, gather the right tools. This keeps your cleaning gentle, safe, and stress-free. You don’t need anything fancy — just soft items that protect every tiny part of your vintage dollhouse.
Use These Simple Tools for Best Results:
- Soft paintbrush – for brushing off dust from tiny corners
- Microfiber cloth – lifts dirt without scratching surfaces
- Cotton swabs – reaches small gaps, stairs, and trims
- Mild dish soap – cleans plastic safely (use only a few drops)
- Hydrogen peroxide (3%) – brightens yellowed plastic (test first)
- Toothpicks – helps apply glue or clean thin gaps gently
- Craft glue – to fix any loose parts without strong chemicals
- Acid-free tissue paper – for wrapping pieces during storage
Each tool has a job. When used right, they protect your dollhouse from harm, and help every part look fresh again.
Safe Cleaning Liquids for Every Surface
Not all parts of your vintage dollhouse can handle the same cleaner. Some need only water. Others need a mix to lift dirt without harm. The safest way to start is with a small bowl of warm water and a few drops of mild dish soap. Use this mix for plastic walls, floors, and hard furniture.
If the surface is sticky or smells musty, try a little white vinegar mixed with water. It works well on unpainted wood and bare plastic. Be careful not to soak anything. Always dip a swab or soft cloth, then blot the spot gently.
For yellowed plastic, you can use hydrogen peroxide. Place the item in a clear container, add the peroxide, and let it sit in sunlight. This helps fade the yellow and makes the plastic look fresh again. Do not try this on painted parts. It may remove color.
Always test your cleaner on a small hidden spot first. That way, you know it is safe before using it on the whole thing.
How to Clean Each Part of Your Vintage Dollhouse
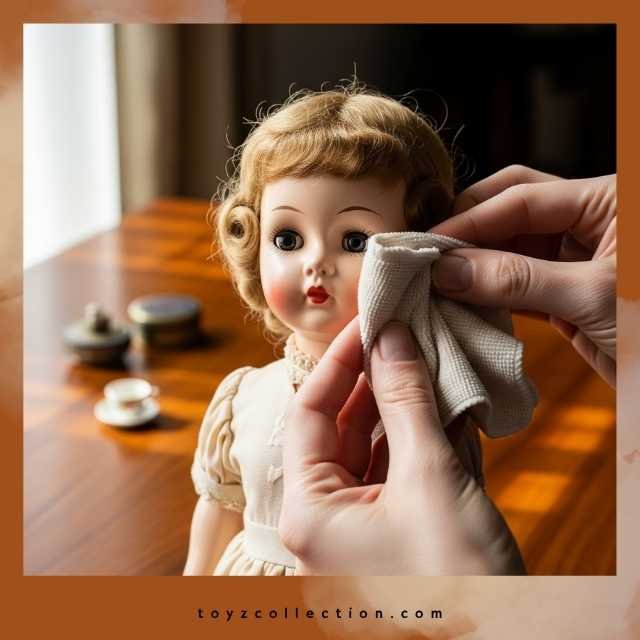
Now that you have your tools and safe cleaners, it’s time to clean your vintage dollhouse piece by piece. Start from the top and work your way down. Begin with the roof. Use a soft brush to sweep off dust. Wipe gently with a cloth if it feels sticky.
Move to the outside walls. If they are plastic, use a damp cloth with soapy water. If they are made of wood or paper, do not use much water. Just blot with a dry or slightly damp cloth.
Inside the rooms, clean the floors and walls the same way. Use cotton swabs to reach small spots, like corners or under tiny stairs. For plastic furniture, dip a swab in soapy water and wipe. Let each piece dry in the open air before putting it back.
Be extra careful with painted or handmade items. Do not rub them hard. Just dab gently. Cleaning a vintage dollhouse takes time, but slow steps keep each part safe.
Mistakes to Avoid When Cleaning a Vintage Dollhouse
Even with the right tools, some small mistakes can cause damage. To keep your vintage dollhouse safe, it’s just as important to know what not to do.
What Can Break or Ruin Your Dollhouse if You’re Not Careful
A little pressure, too much water, or using the wrong cloth can lead to cracks, peeled paint, or soft parts falling off. Below is a table to help you spot the most common cleaning mistakes and what to do instead.
| Mistake | Why It’s Bad | What to Do Instead |
|---|---|---|
| Scrubbing too hard | May break tiny parts or remove paint | Dab or blot gently with soft cloth |
| Using too much water | Can warp wood and loosen glue | Use barely damp cloth or cotton swab |
| Cleaning painted parts with soap | May fade or lift off color | Dry clean first, test water mix on small spot |
| Using regular spray polish | Leaves film or stains on plastic | Use microfiber cloth or toy-safe polish |
| Skipping drying time | Moisture can stay inside and cause damage | Let parts air-dry before reassembling |
Take it slow, clean one part at a time, and always test first. That way, your dollhouse stays in one piece and looks better than ever.
How to Polish and Finish Your Clean Vintage Dollhouse
After cleaning, your vintage dollhouse may look clean but still feel dull. A few safe steps can help bring back the shine. For wood furniture or wood floors, use a small bit of beeswax or gentle furniture polish. Rub it on with a soft cloth. This makes the surface smooth and gives it a warm glow.
If you have plastic pieces, you can wipe them with a dry microfiber cloth. This removes any last marks and helps them shine. Do not use spray polish unless it says safe for toys or models. Some sprays can leave a film or damage color.
If any parts came loose during cleaning, you can use a tiny bit of craft glue to fix them. Use a toothpick to place the glue, so it does not spread too far.
Once every piece is dry and back in place, your vintage dollhouse will look fresh again. It is clean, safe, and ready to show or play with.
How to Store Your Vintage Dollhouse and Miniatures Safely
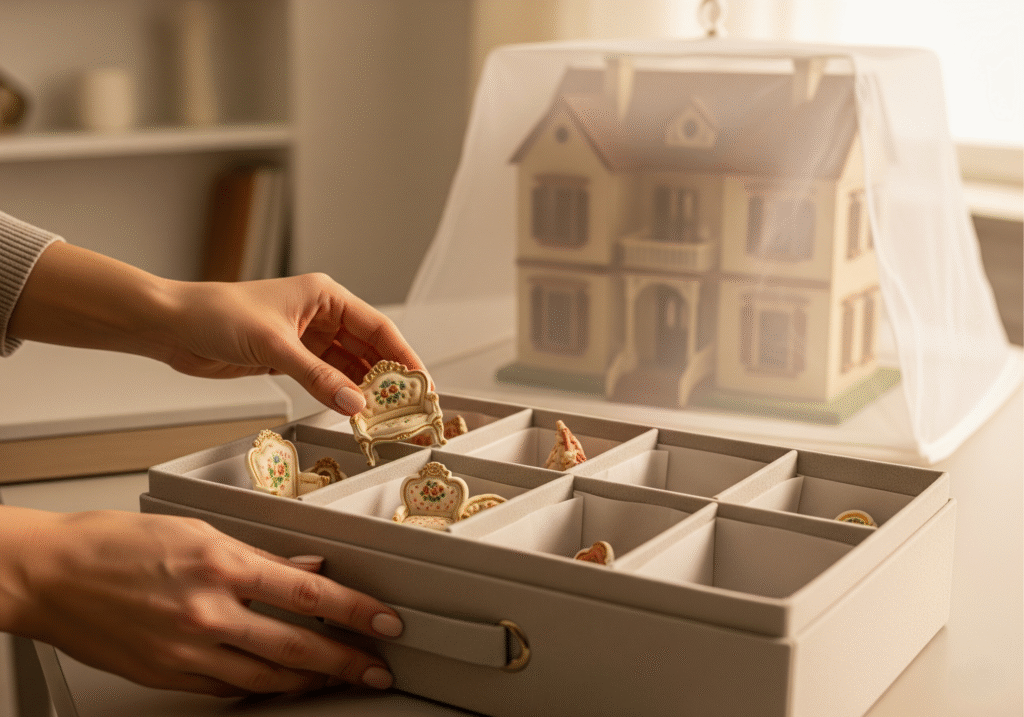
Once your vintage dollhouse is clean, you want to keep it that way. Proper storage can stop dust, moisture, and damage. If you store the house for a long time, or if you keep extra miniatures, follow these simple rules.
Wrap small parts in acid-free tissue paper. This protects paint and stops yellowing. Use soft boxes with dividers to keep tiny items from bumping into each other. For the full dollhouse, keep it in a dry, cool room. Avoid damp basements or hot attics. If possible, place it in a box or cover it with a soft cloth to block dust.
Here’s a quick guide to help:
| Item | How to Store | Why It Helps |
|---|---|---|
| Small miniatures | Wrap in acid-free tissue, place in a box | Prevents color fade and scratches |
| Wooden furniture | Keep in dry box with soft lining | Stops warping or mold |
| Painted pieces | Separate with dividers or soft cloth | Keeps paint safe |
| Whole dollhouse | Cover with cloth or store in large clean box | Blocks dust and sunlight |
| Storage space | Choose cool, dry, indoor area | Protects from heat and damp |
Clean pieces can still be fragile, so handle with care when moving or packing. Your vintage dollhouse will stay safe and beautiful for many years if you store it right.
Cleaning your vintage dollhouse does not have to feel risky or hard. With the right tools, soft hands, and a little time, you can bring it back to life. You learned how to dust each part, wash safely, brighten old plastic, and store everything with care. Each step helps keep your dollhouse strong, clean, and ready for display or play.
Now your tiny rooms shine again. Your furniture looks fresh. And nothing got broken.
Want to take it further? You can now think about adding lights, paint touch-ups, or new pieces. But even if you stop here, you’ve done the most important thing you’ve saved your vintage dollhouse the right way.
No. Baby wipes often have oils and scents that can leave marks or harm the paint. Use a damp cloth with mild soap instead.
Do not use water. Just dust gently with a dry brush or soft cloth. If it’s very dirty, blot with a barely damp swab and dry right away.
If it’s on display, dust it once a month. Deep clean once or twice a year. If it’s stored, check it every few months for dust or damp spots.
No. Vinegar is safe on unpainted wood and plain plastic but may fade colors or soften glue. Always test on a small spot first.
Only on hard, yellowed plastic that is not painted. It helps remove the yellow tint, but it can damage color or soft plastic parts.
Do not panic. Use craft glue and a toothpick to fix it. Let it dry flat for a few hours before touching or placing it back.
More vintage toys that can bring big returns.